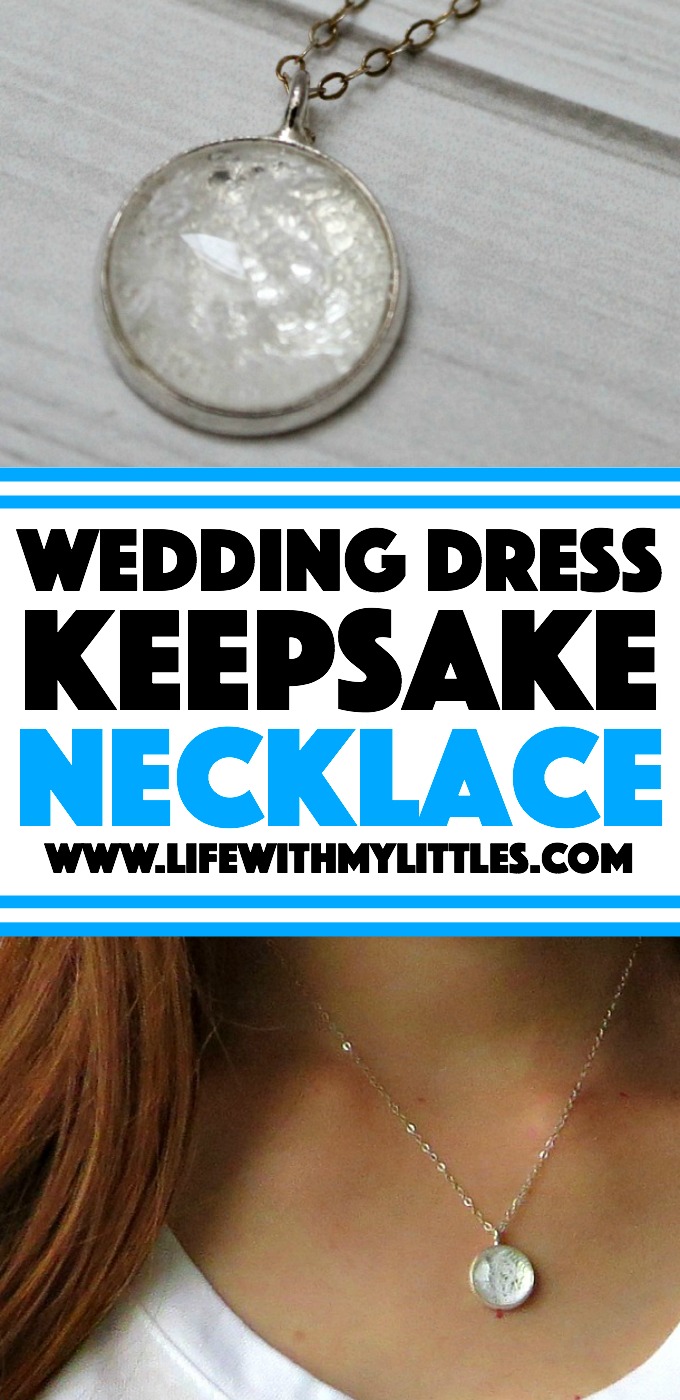
DIY wedding dress necklace tutorial that shows you how to use a tiny piece of your wedding dress to make a quick and easy pendant. Looks gorgeous and a great thing to do with your dress after the wedding!

This post is one of the main reasons I actually started a blog! There was a pin on Pinterest that I saw a million times, but I could not find a tutorial for ANYWHERE.
It’s a beautiful necklace that preserves a piece of your wedding dress for you to always wear. Yes, you have seen it (and probably pinned it hoping to make it one day). But unfortunately, there are zero tutorials for how to do this, and while you can pay $40-50 for someone to do it on Etsy, that is inconvenient and way expensive.
So I decided I would make my own tutorial! And even though it has taken me forever to get it up, I am finally doing it!
Now I know it can be hard to cut your wedding dress (just ask me, I actually did two years ago!), but this necklace only requires a tiny piece and are you really ever going to wear your dress again? I personally decided that I could save my veil for my daughter to wear on her wedding day if she wants because even though my dress was perfect for me, I’m sure it will be out of style in 20+ years. So this is a much better use of my dress!
I am SO HAPPY with the way this turned out! This project has been something I have wanted to do ever since starting my craft blog (haha) and cutting up my wedding dress. I love wearing it, and I love that it is a reminder of the love I have for my husband and the promises we’ve made to each other. And I love getting to tell people that it is made from my wedding dress!!

Now before you get overwhelmed and think “I can’t do that! It’s too hard!” I just want to tell you that this took me about 10 minutes to make. So no matter what your craft skill level is, you can make this!!

DIY Wedding Dress Necklace
DIY wedding dress necklace tutorial that shows you how to use a tiny piece of your wedding dress to make a quick and easy pendant. Looks gorgeous and a great thing to do with your dress after the wedding!
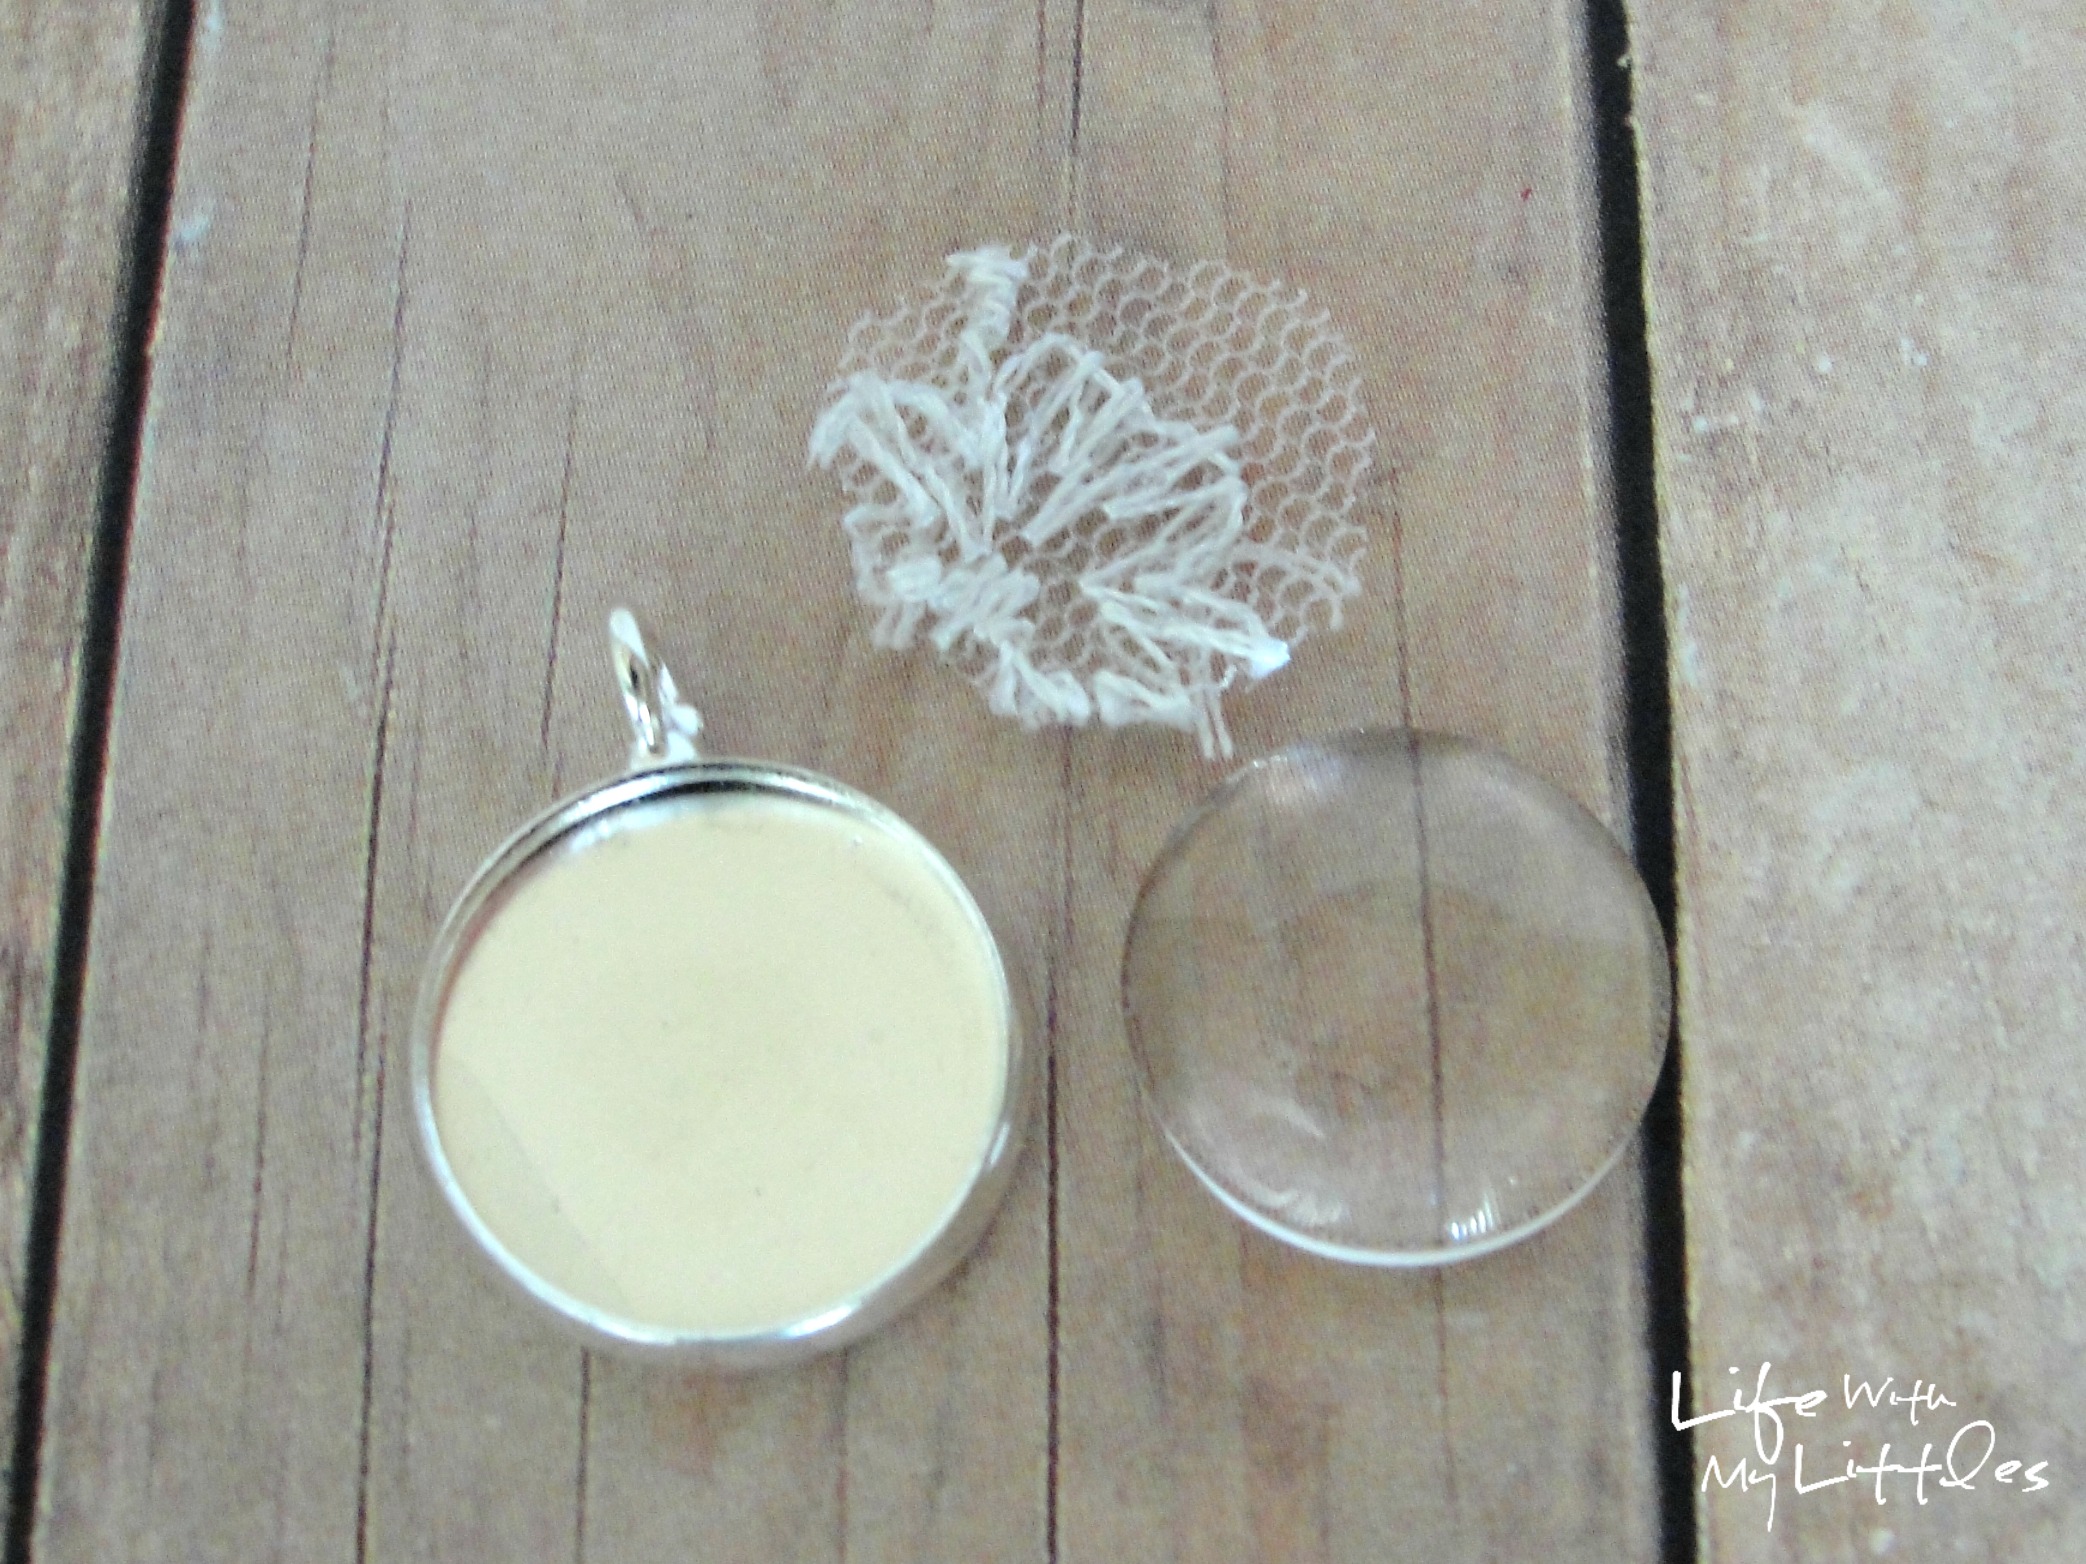
Materials
- One piece of lace from your wedding dress
- A 14mm, 16mm, or 20mm glass circle and pendant tray
- FabriTac clear permanent adhesive
- A small square of cardstock or posterboard
Tools
- Scissors
- A pen
Instructions
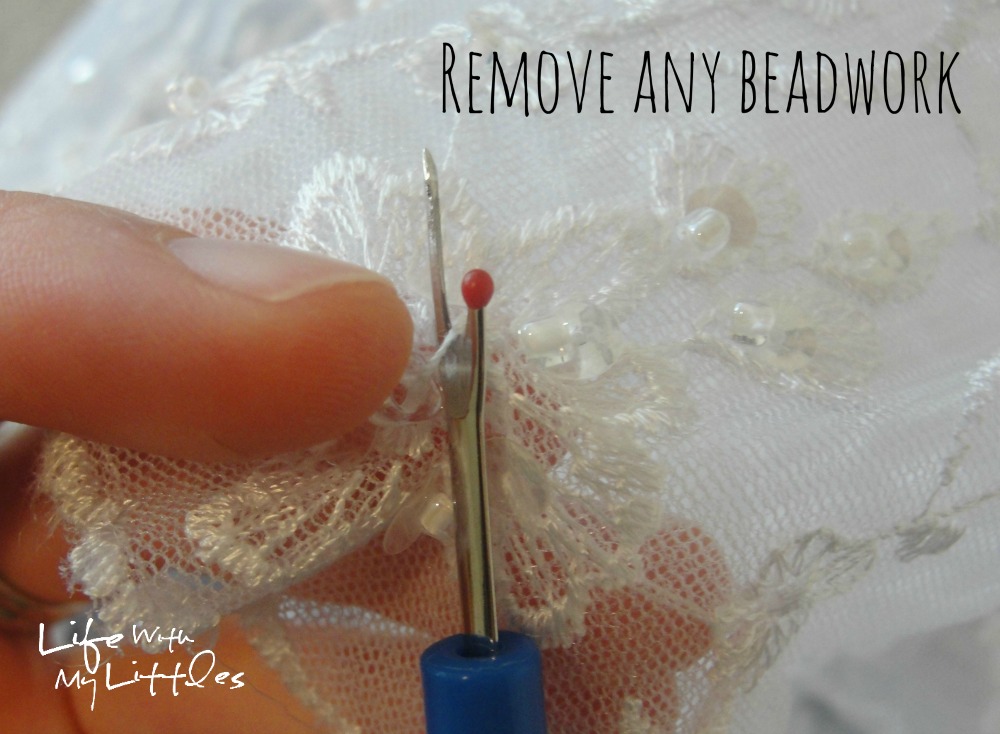
- First, you will need to remove any beading or detail on your lace. Mine had some sequins and beads sewn on, so I just used a seam ripper to take them off a small part of the lace (and I saved the beads for a bracelet!).
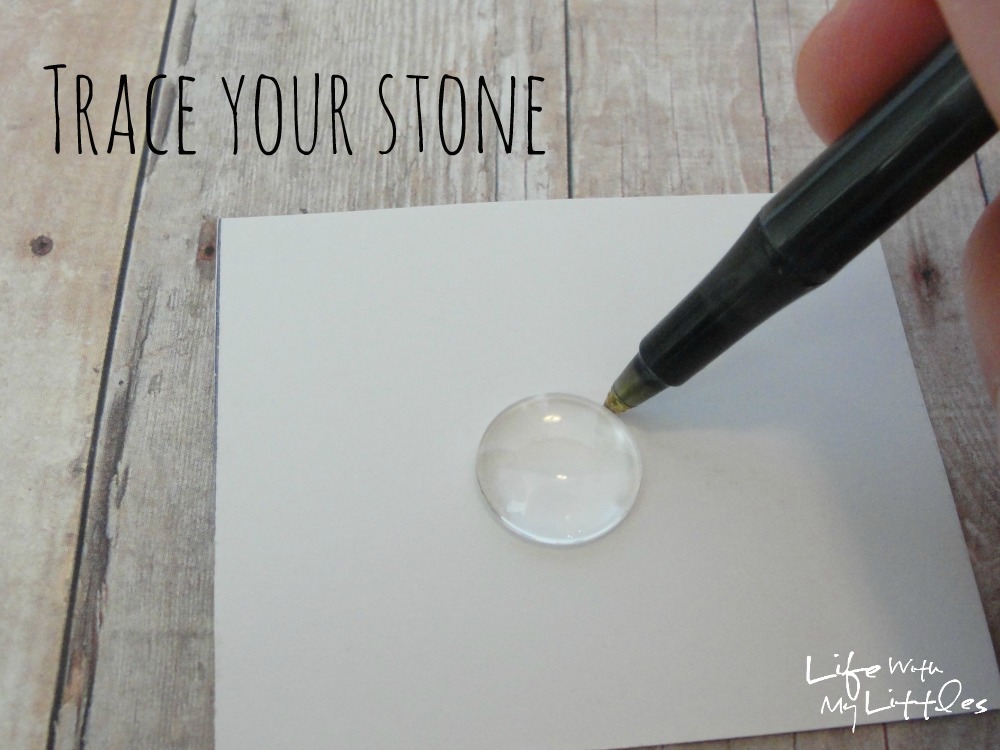
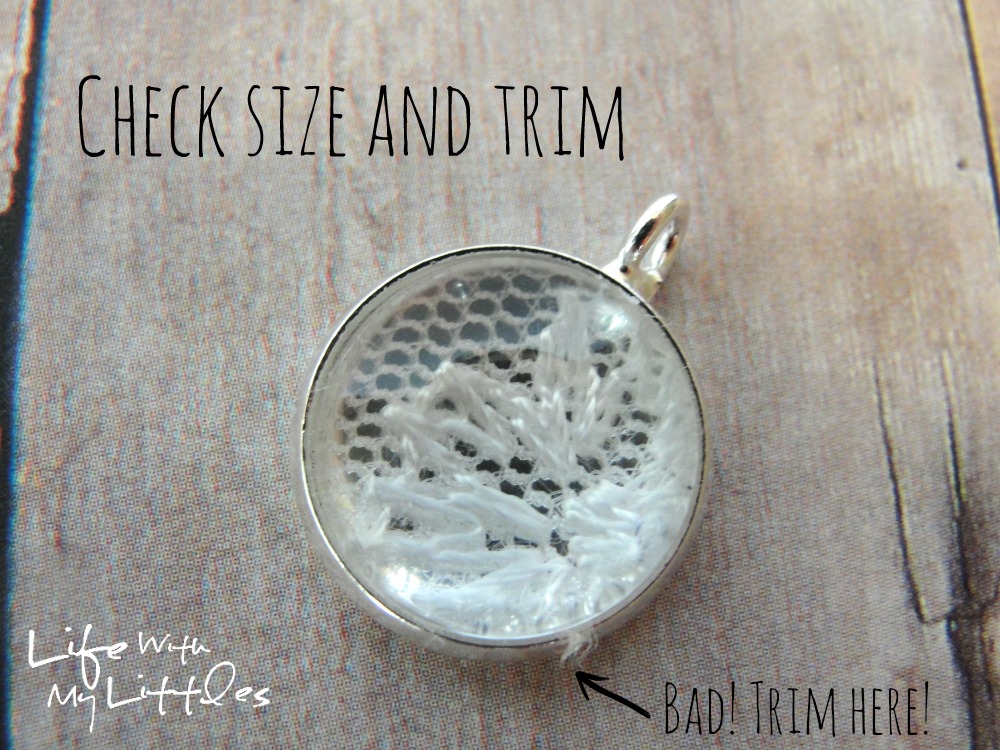
- Trace your stone on the cardboard to make a little pattern.
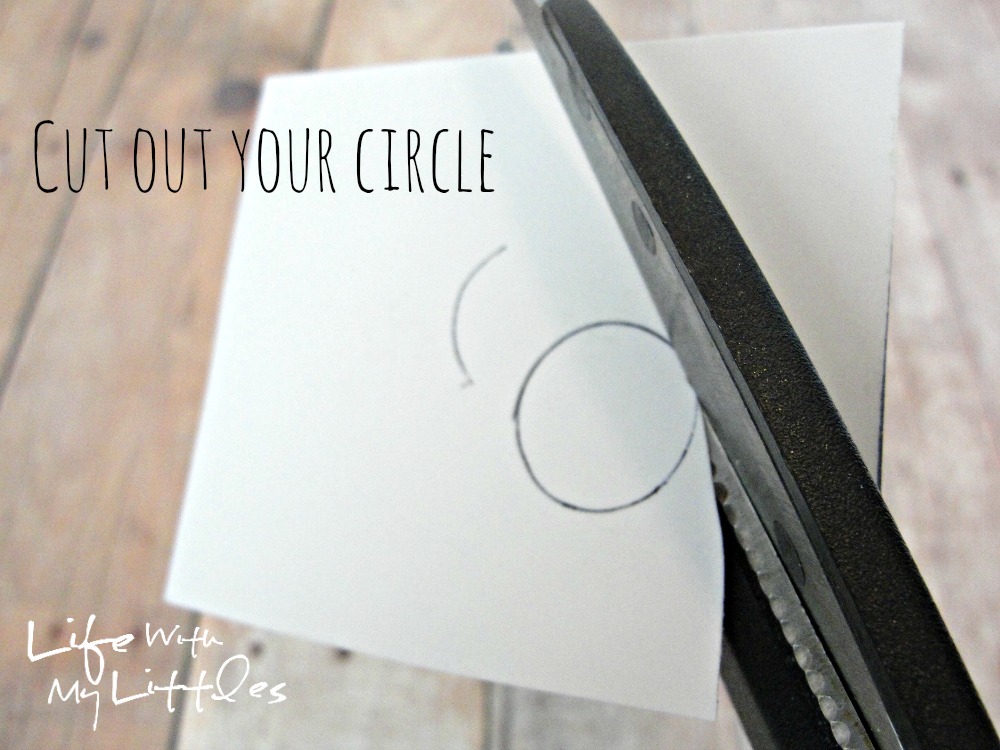
- Cut out your pattern. Note: don’t stick your pattern inside the pendant tray to make sure it fits. It will get stuck and you will be in trouble.
- Next, you will want to decide what part of the lace you want to be seen through the glass stone. Just lay the stone on the fabric until you figure out where you want it.
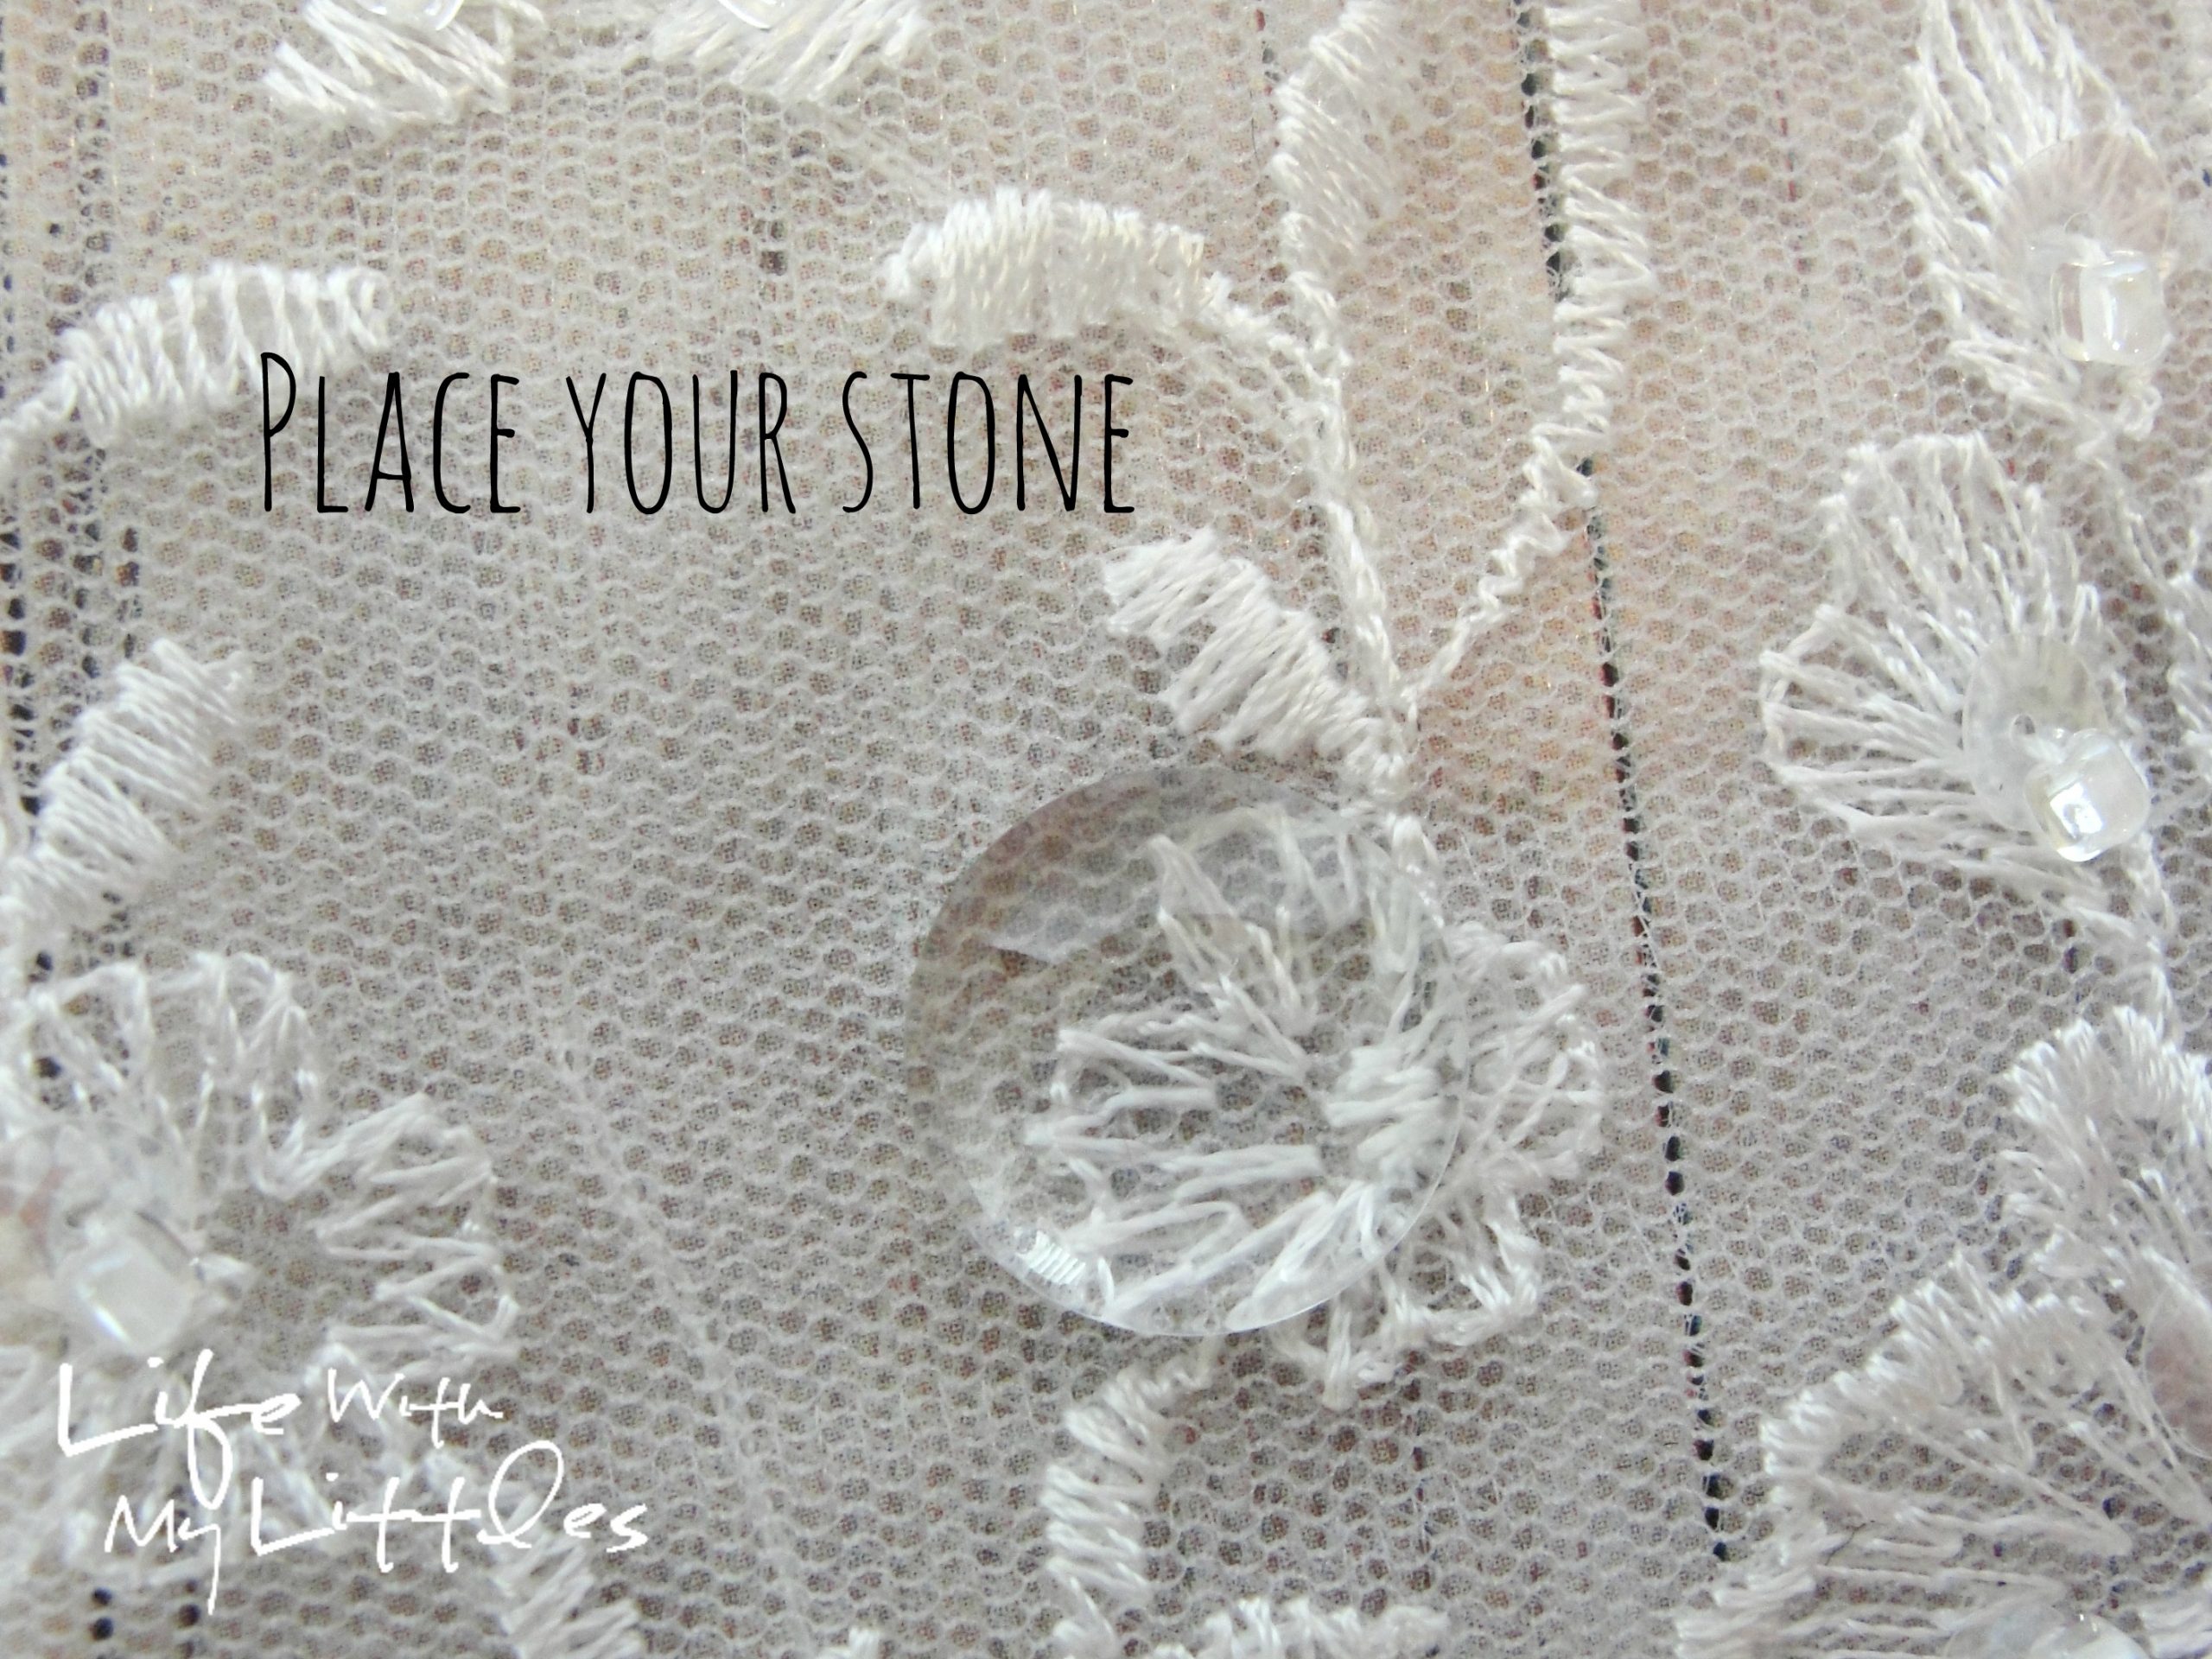
- Place the pattern on that same part of lace and cut around it. Just hold the pattern onto a small square of your lace and cut around it, careful not to move the pattern when you turn the lace around to cut the edges. Note: You don’t want to actually trace the circle onto the lace because when you go to glue the lace, the marking will bleed and be visible through the stone.
- Make sure that your fabric will fit inside the pendant without poking out at all. Put each piece in separately and then place the stone on top. If it is too big, you'll be able to tell. Then you can trim whatever needs to be trimmed.
- Now grab your FabriTac adhesive and put a small dab on the back of the glass stone. Press your lace onto the stone (your hands will get a little glue-y).
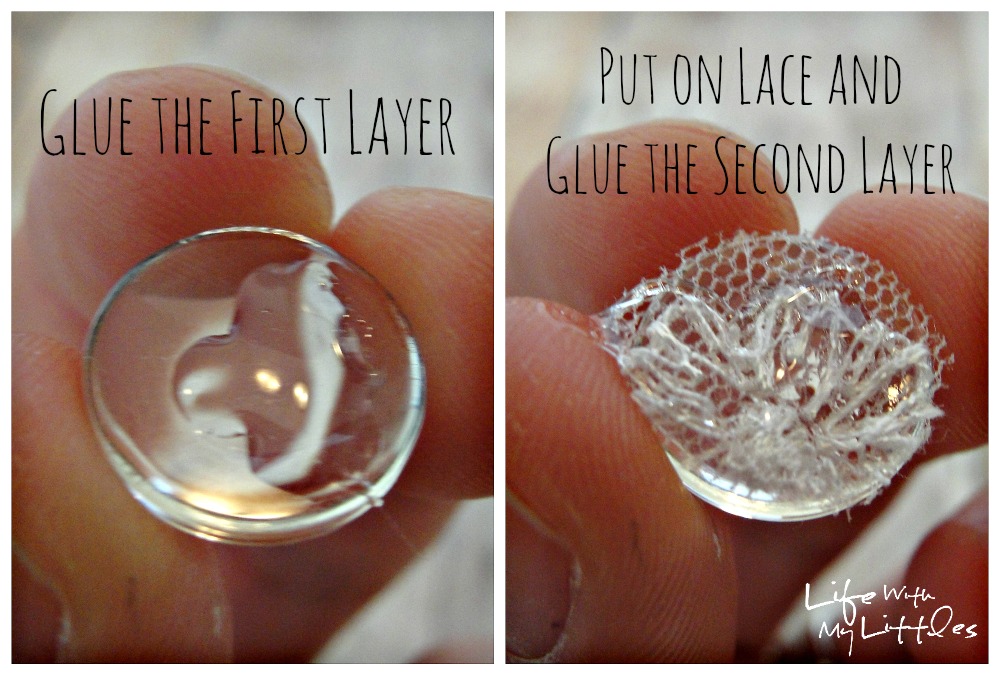
- Then place another small dab of FabriTac on the back of the lace, and then press the stone and lace into the pendant tray. Squeeze tightly so you get out any bubbles! Note: You may get a little glue on top of the stone, so wipe it quickly with a wet paper towel before it dries.
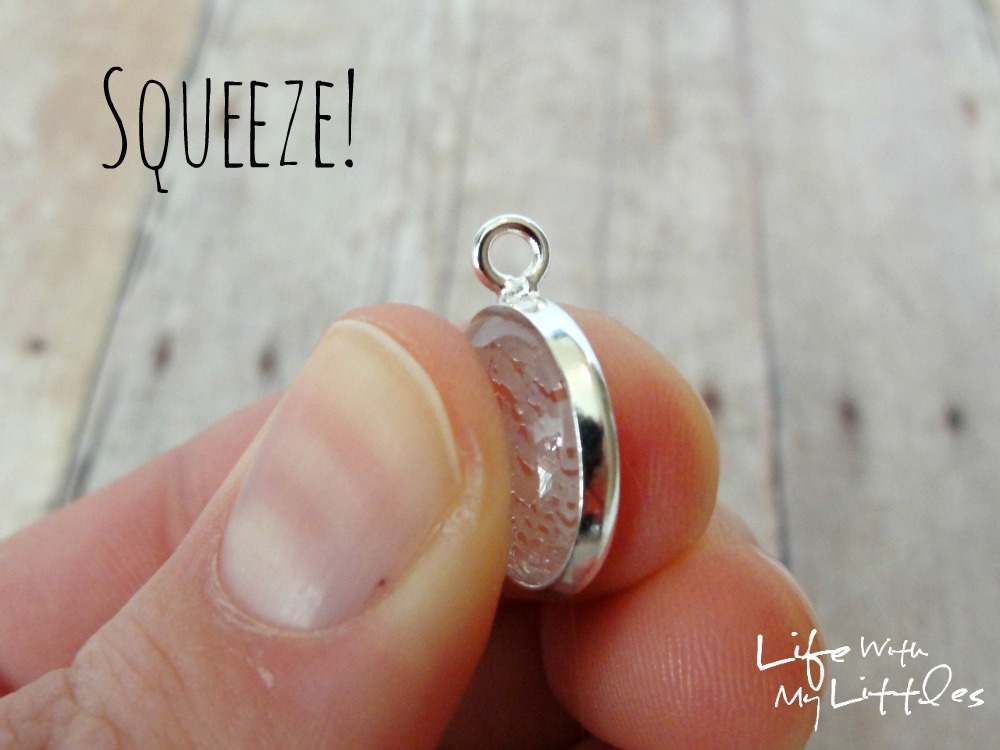
Ta-dah! You now have a beautiful pendant charm made out of your wedding dress that you can wear on a necklace!
Also, as a side note, it took me forever to find a chain small enough that it would fit through the hole of my charm. I couldn’t find one at Jo-Ann or Michael’s, so I finally just ended up getting one off of Etsy. I had to send the charm in to her so she could put it on the chain, but it was worth it!!

Have you done anything special with your wedding dress post-wedding day? I still have the rest of my dress in a box in storage (besides the part I used to make my daughter a gown when she was named and blessed!), so I would love to hear some more ideas!
Nicole says
THANK YOU so much for posting this tutorial! I’m trying to put together a necklace for myself as well as one for my mom with pieces of my wedding dress, hers, and my grandmother’s. This is going to make it possible!
Chelsea Johnson says
You are so welcome! I am glad I could help! I love my necklace, and I’m sure you and your mom will love the ones you make!
Megan says
Quick question – what is the E600 super glue for? I didn’t see it mentioned in the instructions, just the FabriTac permanent adhesive. I don’t want to by the big tube of E600 if I don’t need it. 🙂
Thanks for posting! I can’t wait to make my own!
Chelsea Johnson says
Oh my goodness, you are totally right! I didn’t mention it! Now that I think about it, I think when I did the E600 it wasn’t as clear as the FabriTac, so I just used the FabriTac for the whole thing. I fixed the materials list in the post. Thank you so much, and I hope yours turns out great!
Kaitlin Reder says
Which size pendant tray did you end up using? I found one on the site that looks similar to yours, but it’s an earring tray and 14mm. Do you remember which one it was exactly? I can’t wait to try this out 🙂
Chelsea Johnson says
I’m pretty sure I used a 14mm tray. You don’t want to go much smaller than that!
Heather says
That’s adorable, and so easy to make too! It’s a bit disappointing to put your dress away after the ceremony, but this way, you can carry a little piece of it with you everywhere you go. Thanks for sharing!
Chelsea Johnson says
Thanks, Heather! It’s definitely a special keepsake you can make!
Ramona says
You can just use a small jump ring on your pendant next time to attach the pendant to the chain
Chelsea Johnson says
Thanks!
Debra says
Hi Chelsea, I’m trying to make one of these with some vintage wool cloth. The spot of glue shows through the material. Have you had this problem?
Chelsea Johnson says
I’ve never used vintage wool cloth, so I can’t say that I’ve had that problem! Sorry!
Jamaica says
Hi,
Wondering if you’ve had any issues with the lace turning yellow after a few months. I did this, but with diamond glaze glue and it turned the lace yellow. Will using fabri tac ensure this doesn’t happen?
Chelsea Johnson says
Mine is still looking white years later, so maybe it was the glue you used?
Jessica Lowe says
Thank you for this tutorial. I have 4 boys and want to do something with my dress for them or third future brides. I decided to make Christmas stockings, a tree skirt, and ornaments but know I’ll have more of my dress left. This is something I can make to pass on to future daughter in-laws as thier something old for thier wedding day. Thank you again
Chelsea Johnson says
Oh I love that idea! That will be so special!
Kay says
I used the link to look for the locket, but couldn’t find it. Could you help me?
Thanks!
Chelsea Johnson says
You might want to send her a message and see if she has any available!
Ashley Weber says
I love this idea!! When you put it together was there no backing between the two stones? Just stone, lace, and stone?
Chelsea Johnson says
Thanks! But I’m not sure what you’re asking! There was only one stone. Inside the pendant I did a layer of the lace and then the stone.
Mary bruening says
Where can the lockets be found?
Chelsea Johnson says
I got my pendant tray on Etsy!
Esta Reynolds says
I love the idea, as my daughter died the day her baby was born. She was only married 1 year, 1 month and 1 day. My daughters dress was made from 3 patterns and I have about a half yard of lace and silk left. I want to do this for my granddaughter. Thanks for the idea.
Chelsea Johnson says
That would be such a sweet, thoughtful gift! And I’m so sorry for your loss.
Mary Bruening says
Where do you buy the little things that the wedding dress lace goes in? I would like to do this.